
What to Know About Wallpaper Before You DIY

My obsession with wallpaper hit its peak during the pandemic. We finally had the time to be patient enough to go through the whole wallpaper experience – ordering samples and deciding which pattern to choose. But most of all, it was when I spent more time in my office than in any other room in the house. I needed the space to feel special.
We started off safe, ordering samples of solid colors and grass cloth options. At the time, I don’t think Steven was 100% convinced about going BOLD. Although they were all beautiful, they didn’t quite hit the mark. Something was always off, and nothing screamed my name.
Weeks before the shutdown, on 2-22-2020, we got married in a beautiful tropical wedding ceremony at Rivera Maya, Mexico. Our invitations were elegant, with green palm accent press prints and natural scenery that highlighted the venue. I wanted to relive that moment, and the best way I could think of doing that was through our home design.

When I chose my first wallpaper, it was based on a feeling I was trying to recreate. I wanted to feel transported out of the office and into that magical moment. The moment I saw the Serena & Lily palm option, I was hooked. We ordered the sample and finally jumped two feet in.
Lessons learned:
1. Take your time. The perfect wallpaper will speak to you, and you shouldn’t rush. For us, this meant ordering several samples from multiple places. Take the time to collect various selections to ensure the texture, color, and feel are perfect.
2. Start small. Wallpapering an entire room is an aggressive first-time move. Corners and windows are challenging. (Definitely hire a professional if this is the route you are taking.) My advice is to start with one accent wall.
3. Consider color-matching. I took a sample of the wallpaper to Lowes, and they matched paint to the green in the palms, transforming the bookshelves in the room to coordinate perfectly.
4. Order an extra roll. By the time you match up the pattern, you lose quite a bit of material. An extra roll should ensure you are fully equipped for the room.

Fast forward a year, we were in a new house and had yet another office to bring to life. The vibe of our Tennessee home was much different, and the beachy Serena Lily patterns didn’t seem to resonate with me anymore. I was looking at a few different prints with House of Hackney because I was ready to go even bolder. I wanted bigger and brighter for this room. When I was searching for wallpaper, my grandmother had just passed. Her favorite flower is a sunflower, and the Avalon Petrol print was an obvious choice. We took the lessons we learned from the first go-round and only did an accent wall. We took the print to Lowe’s again and painted the remaining three walls the same blue found in the design.
Lessons learned:
1. Trust your gut. I had been eyeballing the same wallpaper for about a month before pulling the trigger and ordering it.
2. Don’t be afraid to hang accent pieces against the wallpaper. This time, I incorporated gold frames I found at local antique shops. This became my signature Zoom background (IYKYK) and really brought the room together.

The wallpaper journey continues …
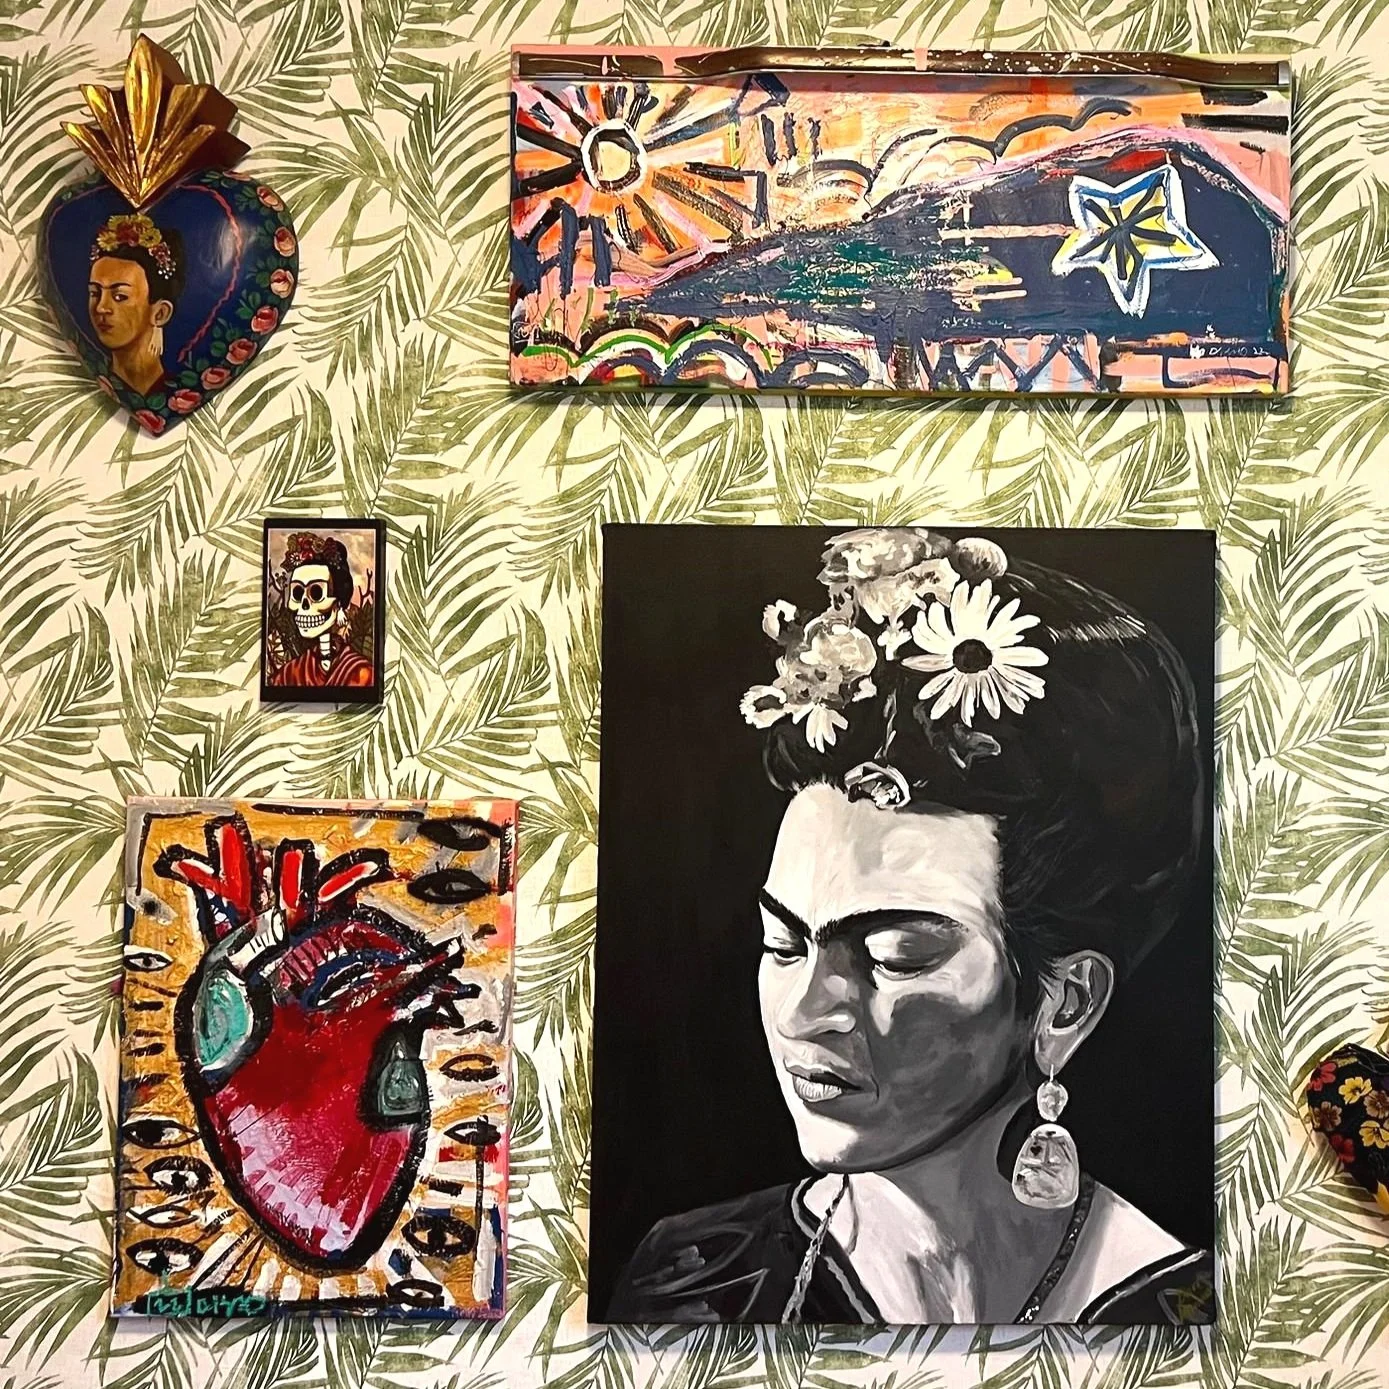
Recently, you may have seen that I helped my sister create a Frida Kahlo inspired room in her new home. This was the first time I considered peel-and-stick wallpaper, and we were pleasantly surprised at the quality and feel. My sister has textured walls, so I was nervous about how the wallpaper might bubble. We decided to test it out using a peel-and-stick; that way, if it didn’t work out, there was no harm or foul behind the experiment. Using the lessons we had previously learned, we created a Frida-inspired room. After many hours of research and multiple store visits, we chose the Scott Living (HGTV Property Brothers) peel-and-stick wallpaper from Lowe’s. The quality was thick, sturdy and budget-friendly, and after adding elements of art against the wallpaper, the room came to life.
Lessons learned:
1. Experiment. Much to our delight, we discovered peel-and-stick worked well, even on textured walls. It’s the best way to dip your toes into DIY wallpaper.
2. Not everything has to match. Incorporating art into the room allowed us to pull colors to brighten the space with a bright comforter and fun accent rugs.
3. Peel-and-stick is an affordable option. This wallpaper is about a quarter of the cost of traditional materials. If you are on a budget, this warrants a second look.

Finally, we’re in our new home in Nashville. During the building phase, we were introduced to Aimee Lee from ALK Design & Interiors, who created a masterpiece with her vision for our house. We were ready to take our wallpaper obsession to the next level, leaning into Aimee Lee’s expertise. What was missing? Full-room concepts, attention to detail, and the guidance of a professional. We wanted unique designs that couldn’t be found just anywhere, and we needed help creating a story that would bring the house together through design.
Ready to wallpaper? Here are a few materials you may want to consider adding to your arsenal before install day:
1. Wallpaper Roller (aka Steam Roller) or Wallpaper Smoothing Tool: Little bubbles will appear, so a steam roller can help smooth out the wallpaper as you apply it.
2. Large Sponge: As you are smoothing out the wallpaper, a large sponge is super helpful to stay clean as you apply. Your hands naturally get a bit dirty, and the sponge allows you to smooth the wallpaper without ruining the print.
3. Large Metal Ruler/ Straight Edge: Cutting wallpaper is an art. You want to be as precise as possible, and having a straight edge will help you achieve those perfect line cuts.
4. Paint Brush for Glue: For traditional pasted wallpaper we use a large 6-inch paint brush to apply the glue versus a roller (it’s worth the investment). This allows us to carefully apply the glue so the wall paper has enough adhesive but is not being dunked or ruined with too much application.
Glue: We use Roman Pro-543 Professional
5. Fabric Scissors: When cutting the wallpaper, you’ll want a pair of scissors that are crisp and clean so all your lines are as precise as possible.
6. Workspace! Get organized. You need to establish a clear workspace so you can measure and cut properly. We usually use a simple folding table.
If the challenge seems overwhelming, hire a professional! Our friends over at Aimee Lee Kinssies Design will give you the full white-glove service. You won’t regret it!
Stay tuned to hear from our designer Aimee in our next blog!
Aimee Lee Kinssies
https://aimeeleekinssiesdesign.com
Instagram: @alkdesignandinteriors
Located: Nashville TN